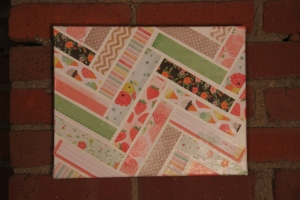
Mr. Grumpy declared the other day that he feels I need to live up more to my header up there, where I claim to talk about apartment dwelling. I thought talking about the hardships good times of living with Mr. Grumpy was enough to let you in on what apartment dwelling was like, but alas. He’s right. I haven’t given you an apartment DIY project in quite some time.
His exact words were, “All people are going to think we do is eat.” Which is really all we do, but to throw you off a bit, I’m sharing this fun yet equally frustrating DIY project my BFF Ashley and I attempted after finding it on Pinterest. Of course, when we found it on Pinterest, it had no instructions with it. So, naturally, we improvised (we’re not this talented).
I’m not going to lie – this took us a good five hours. One footlong sub and an entire jug of Mod Podge later, we were pretty convinced that A) we should not be allowed to craft and B) the Mod Podge may never come off our bodies … ever. We were COVERED in Mod Podge, but when we finally finished this, boy were we proud. So, if you’re feeling brave, go ahead and give this a try. It’s a fun little piece for your gallery wall or for a fun housewarming present.
What You’ll Need:
- 1 small blank canvas (we got ours at Wal-Mart. They were about 8.5×11)
- Scrapbooking paper of different patterns
- Scissors
- A bottle of Mod Podge
- Foam paint brushes
- Your dignity (you’ll loose this later, after four hours of cutting and gluing and realizing you have to start over because you laid out all your paper slices and realized you forgot to put the Mod Podge on the canvas… I digress)
First, you should start by cutting out your strips of paper. It is really important that they are all the same size. Ours were about a half-inch wide and 4 inches long. It depends on how wide you want your chevron. Or how well you’re planning ahead. You’ll need about 30 strips.
Next, Ashley and I laid out our strips of paper. Actually, we laid them out so perfectly that we realized we forgot to Mod Podge the back of them. Don’t make this mistake. Slowly, place the first strip on the upper left corner of your canvas so it dips in toward the middle. Press that down lightly so the Mod Podge sticks to the canvas.
Next, take another strip (different pattern) and, in the opposite direction, place its edge up against the first strip’s end, leaving a bit of a gap. It will look like a V block letter from college shirts. Each edge will meet each other and create a new row, moving downward. Repeat this until you’ve covered the entire canvas. It’s almost like braiding your hair – so, one strip’s end will be the next’s starting place.
Then, once all your strips are placed, cover the entire canvas with a thin layer of Mod Podge. Make sure that there are no bubbles on your strips – if there are, gently press them down. Next, your edges will still be sticking out. Begin on one end, and gently fold them down and around to the back of your canvas. Mod Podge the edges down and place the entire piece of art on a canvas to dry. It won’t take long to dry. We used the glossy Mod Podge to add to the finish of the … dare I say… art.
Proud??? You should be. This baby was tough. (Thanks, Pinterest)

