Happy Halloween! It’s time for Mummy Pretzels!

I love Halloween. I love ghost stories, pumpkins, Halloween TV specials, spooky candles, witchy brews, costumes … Really. I love it all. As such, our apartment right now looks like the Headless Horseman and his crew of goblins regurgitated spookiness all over. I mean – I literally have pumpkins everywhere. And what’s even better is I’ve discovered the gloriousness of LED candles – why? They burn for like three weeks before you have to replace them. Which means that we can have our spooky Halloween-themed candles burning all. day. long. Awesome.

Mr. Grumpy is being extremely patient. Decorating makes him extremely grumpy. He’d much rather relax in our apartment without getting attacked by pumpkin pillows or the scent of my latest pumpkin spice candle. The end of Halloween for Mr. Grumpy also means that as my Halloween decor box gets put back in storage, out will come the Christmas tree. It really is the most wonderful time of the year. I suspect that he is really not looking forward to decorating the tree while I force him to listen to the N*Sync Christmas album …

Knowing my love of all things October 31, I could not resist making these mummy treats for us to take over to Kelsey & B-rad’s engagement party tonight. These were so easy to make and they’re just so darn cute that you really should make them before Halloween ends this year (thus why I’m posting this today, and not tomorrow. You have 24 hours – go!). I had just finished making them when Mr. Grumpy started eating them by the pounds, so don’t worry – they will definitely fulfill your sweet tooth.

IMG_2953
Mummy Pretzel Rods! The perfect Halloween treat! (PS: Mr. Grumpy’s mom made me these beautiful Halloween-themed placemats! Jealous?)

What You’ll Need: 

  • 1 package of milk chocolate CandiQuik coating (you can get this in the baking aisle. This is the brand Meijers carries, so really any brand of candy coating will do)
  • 1 package of white chocolate CandiQuik coating (yes, it annoys me, too, how they spell their brand name)
  • 1 bag of pretzel rods (about 12 rods)
  • Toothpicks
  • A microwave

First, line a baking sheet with non-stick aluminum foil or parchment paper. Make sure it’s non-stick! This will be really important. Next, take all the rods out of the bag and set the broken rods aside. With the remaining full rods, put them in a nice row next to your baking sheet.

Next, microwave the milk chocolate according to instructions. It is really important that in between each blast in the microwave that you stir thoroughly for at least 30 seconds. The chocolate will continue melting as you stir it, and as such – you don’t want to put it back in the microwave if you don’t need to or it will caramelize. This sounds awesome, but it’s not and you’ll have to go BACK to the store and buy a whole ‘nother package of the candy coating and you’ll be really pissed and your mummies won’t bring you as much joy. I digress…

Once the milk chocolate candy coating is smooth and melted, start rolling the rods one-by-one into the chocolate. Use a spoon to get the chocolate all the way down to about 1 inch away from the end of the rod. You can use the back of the spoon, too, to smooth out the chocolate. Set each rod gently onto the baking sheet. Continue until you’ve completed all the rods (I made about 12).

Now, place your baking dish in the fridge. In the meantime, microwave your white chocolate according to package instructions. Remember that white chocolate is a bit more fragile and susceptible to caramelizing than milk chocolate. As such, you may want to turn down the level on your microwave from high to medium. Really stir the chocolate in between each blast to make sure you’re not overheating it. Remove the pretzel rods from the frige.

Once the white chocolate is smooth and ready to go, pour it into a Ziplock bag. Cut a toothpick-sized hole in the corner of the bag. Moving over each individual pretzel rod, make small sweeping movements in the shape of little X’s starting at about 1.5 inches down, all the way down to the bottom of the milk chocolate. Give your mummy a hat by criss-crossing at the top as well. Do this to all your pretzels until they’re all dressed like mummies. It’s ok if some are messier than others – they’ve been hibernating in coffins for years … do you think they’re going to look put together?!?!

Next, take a toothpick and dip it in the white chocolate. Dot little eyes on each mummy in between the “wrapping.” That should dry pretty quickly, but let that set for a minute. Reheat the remaining milk chocolate you have (trust me you will have some!) and, with a new toothpick, make little brown dots on top of the larger white dots. Voila! Mummy eyes!

You’ll want to let those dry for a little bit before removing them from the baking sheet. Once they’re completely hardened, you can serve immediately or store in Ziplock bags to make sure they stay fresh!

IMG_2946
Happy Halloween, ghouls! Hope you get more treats than tricks!  

PS: I found the idea for this on Pinterest, which by the way is the best place ever to find fun Halloween inspirations. You can follow my Fall Fun board for more ideas! 

So what about apartment dwelling?

Mr. Grumpy declared the other day that he feels I need to live up more to my header up there, where I claim to talk about apartment dwelling. I thought talking about the hardships good times of living with Mr. Grumpy was enough to let you in on what apartment dwelling was like, but alas. He’s right. I haven’t given you an apartment DIY project in quite some time. 

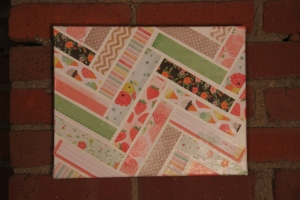
His exact words were, “All people are going to think we do is eat.” Which is really all we do, but to throw you off a bit, I’m sharing this fun yet equally frustrating DIY project my BFF Ashley and I attempted after finding it on Pinterest. Of course, when we found it on Pinterest, it had no instructions with it. So, naturally, we improvised (we’re not this talented). 

I’m not going to lie – this took us a good five hours. One footlong sub and an entire jug of Mod Podge later, we were pretty convinced that A) we should not be allowed to craft and B) the Mod Podge may never come off our bodies … ever. We were COVERED in Mod Podge, but when we finally finished this, boy were we proud. So, if you’re feeling brave, go ahead and give this a try. It’s a fun little piece for your gallery wall or for a fun housewarming present. 


IMG_2873

What You’ll Need:

  • 1 small blank canvas (we got ours at Wal-Mart. They were about 8.5×11)
  • Scrapbooking paper of different patterns
  • Scissors
  • A bottle of Mod Podge
  • Foam paint brushes 
  • Your dignity (you’ll loose this later, after four hours of cutting and gluing and realizing you have to start over because you laid out all your paper slices and realized you forgot to put the Mod Podge on the canvas… I digress)

First, you should start by cutting out your strips of paper. It is really important that they are all the same size. Ours were about a half-inch wide and 4 inches long. It depends on how wide you want your chevron. Or how well you’re planning ahead. You’ll need about 30 strips. 

Next, Ashley and I laid out our strips of paper. Actually, we laid them out so perfectly that we realized we forgot to Mod Podge the back of them. Don’t make this mistake. Slowly, place the first strip on the upper left corner of your canvas so it dips in toward the middle. Press that down lightly so the Mod Podge sticks to the canvas.

Next, take another strip (different pattern) and, in the opposite direction, place its edge up against the first strip’s end, leaving a bit of a gap. It will look like a V block letter from college shirts. Each edge will meet each other and create a new row, moving downward. Repeat this until you’ve covered the entire canvas. It’s almost like braiding your hair – so, one strip’s end will be the next’s starting place. 

Then, once all your strips are placed, cover the entire canvas with a thin layer of Mod Podge. Make sure that there are no bubbles on your strips – if there are, gently press them down. Next, your edges will still be sticking out. Begin on one end, and gently fold them down and around to the back of your canvas. Mod Podge the edges down and place the entire piece of art on a canvas to dry. It won’t take long to dry. We used the glossy Mod Podge to add to the finish of the … dare I say… art. 

Proud??? You should be. This baby was tough. (Thanks, Pinterest)

Happy Fourth of July, ‘Mericuh! (Flag Cake & DIY Sparkler Favors)

Fourth of July is such a great holiday. You get to eat hot dogs (awesome). Play with fireworks (DS's favorite activitiy). Watch the professionals do fireworks without catching your backyard on fire (this doesn't happen at the Steiner Ranch. We watch DS do Chinese lanterns and experiment with gasoline-laden driveways while the kids – aka, me – run around half-hazardly with sparklers. The fire department in Findlay actually recognizes us as they've been out to our house to put out many fires in our day. Note to readers: Before catching your driveway on fire, remove your cars. This is just from experience, though).

Mr. Grumpy actually likes the Fourth of July because he gets to walk around doing his best Livin' in the Sticks impression (aka, Hillbilly talk. For the record, he calls Findlay "The Sticks" even though he's the one who grew up in a township for God's sake) and call our great country… 'MMMMericuh. In fact, he loves this so much, we even had a sign last year that at ONE point said I Love America, but when I wasn't looking, Mr. Grumpy removed the "A" from it, so it just read, "I Love Merica). Awesome…

Suzie Q and my sister Erin typically get extremely patriotic and make what they call a Flag Cake. Now, anyone who knows me well knows I have a fear of fruit mixing together. Meaning, when Mr. G and I eat berries, I have to have a separate bowl for blueberries, one for raspberries and one for strawberries. He's learned that if he puts Cool Whip in between the berries in the same bowl, I will be ok.

Flag Cake is the one exception to the fruit-touching rule. Why? Well, because it's awesome. The fruit is laying on top of layers of cookies and frosting. And because it looks like the American flag. Extremely cool. So, this year was no different. Suzie Q was SUPPOSED to wait to make it with me, but alas, she jumped the gun and made it without me. I'm still going to share the recipe with you.


Flag Cake

 Here's what you'll need:

  • 1 package of sugar cookie dough (the kind that comes in a plastic tube. I buy the Pillsbury brand. It's by the butter and cheese in our supermarket). It helps if the dough has had some time to get to room temp so it's easier to deal with
  • 1 container of white frosting 
  • 2 containers of raspberries, rinsed and dabbed dry
  • 2 containers of blueberries, rinsed and dabbed dry 
  • Preferably some American-themed music – like that theme song from Fifel Goes West or I'm Proud to Be an American or I Love Rock n Roll – to play when you present your cake to the world (it's your tahdah moment, people!)

First, take a rectangular baking sheet and spray it with non-stick cooking spray. Spread your cookie dough out evenly on the pan. This is the base of your flag, so no, do not substitute your rectangle for a circle. People will be confused and I may have to deport you. (I don't really have this kind of power).

Bake your cookie dough as the package directs, until it is lightly brown but still very white on top. It will still be a little squishy when you remove it from the oven. Don't over bake it, though. It will cool and harden up a bit. Plus, no one likes a stale flag – it won't wave symbolically in the wind. Right? (I'm cracking myself up). 

Next, let your cookie cool. This would be a good time to test your Fourth of July cocktails to make sure no one has poisoned them. (My dear friend Leslie and I once had Fourth of July shots that literally were stacked blue, then white, then red IN THE SHOT GLASS. If anyone knows how to make these at home, I welcome your instructions below on my comment board.) Once your cookie is cool, spread the frosting out evenly over the top. 

Next, take your blueberries and a square of blueberries in the upper left hand corner. Or however many that LOOK like 50. Remember that this flag is not to scale – so you don't need to count out 50 blueberries and place them on your cake. I know we like to be accurate, but geeze people. That's just a lot of counting. Next, make stripes of raspberries all the way to the end of the right side, starting from the left side, leaving about a quarter of an inch between each row. These are your stripes. Again, you don't have to be accurate about the stripage. I think there's 13 stripes on the real flag, but you'll probably only get to about 8 or 9 on this one, especially if you're like me and eat the fruit the entire time you're making your cake. 

And voila! Freedom on a cake. What could be better? 

Sparkler Party Favors

Well, I'll tell you what may … take the cake … at your Fourth of July party (oh gosh. I'm full of puns today). Amazing sparkler party favors. I made these for an anniversary party I was planning, but they are OH SO PERFECT so I just had to share.

Sparkler favors 1
Here's what you'll need:

First, you'll want to open/download this file (I found these free printables at Tidy Mom: http://tidymom.net/2013/printable-sparkler-holder). Open Microsoft Word, and choose the Header/Footer function. Copy and paste this JPG into the header/footer. If you do not have Microsoft Word, you can just select to print the JPG, and select the full-page function when you tell it to print. Then, print these out on your color printer using a heavy, white card stock. I just told my computer to print 30 pages because I had to make a ton of these for this anniversary party. If you have 20 guests coming to your party, you probably only need to print 6 pages. (Aren't I awesome at math?)

Next, using your paper cutter machine, cut your paper into three sections. If you don't have one of those handy machines, then just use a pair of scissors. And take an IB Profin because your hands are going to hurt. Then, take your X Acto knife, make tiny slits on the top of the middle box, and at the bottom (about a half inch wide). You don't want to make your slits too wide because the sparklers will fall out, and then your guests will be annoyed. And then you'll blame me… Not cool. Next, once all your paper is cut and the slits are made, place about a half box of sparklers in the slit and out the other side (like you're weaving a basket. I'm sure you have a lot of experience doing this). You should have about 5-6 sparklers per piece of paper. And voila! Your Fourth of July party just went Martha Stewart. Awesome.

Sparkler favors 2

Happy Birthday Red Velvet Cupcakes + DIY Coasters

IMG_2549

I don't know if you know this, but Heidi Klum's favorite cupcake is Red Velvet (or it was in 2008 when I was interning at her agency)… No big deal, guys. I've shared a cupcake with Heidi Klum. What have you done with your life…? Ok, fine. We didn't SHARE one cupcake. Like, she brought red velvet cupcakes into work, and then watched as I ate one. But still…  

Anyway, so when I asked Robin what she wanted to eat at her birthday party, naturally her answer was Buffalo Chicken Dip and Red Velvet Cupcakes. She's probably one of my most stylish, classiest friends (though all my friends are classy, obviously, because I'm super classy). 

So here's the trick about red velvet cupcakes. Did you know that all red velvet cupcakes really are is just chocolate cake with a TON of red food coloring in it? Um yeah. It's really that simple. So, as long as you've got cocoa powder, you can basically make it at home any time you want.

What You'll Need:

  • 2 1/2 cups cake flour
  • 1 1/2 cups sugar
  • 2 1/2 tbsp cocoa powder (I use Hershey's)
  • 1 cup of water
  • 4 tbsp cultured buttermilk blend powder
  • 1 tsp baking soda
  • 1 tsp salt
  • 2 eggs
  • 1 1/2 cups canola oil
  • 1 tsp white distilled vinegar
  • 2 tsp vanilla extract
  • 1/2 tsp almond extract
  • 1 8 oz container of cream cheese, room temperature
  • 1 stick of unsalted butter, softened
  • Red food coloring
  • 3 cups of powdered sugar
  • Candy pearls (find these in the baking aisle with the sprinkles)

First, preheat your oven to 350 degrees. Line your cupcake tins with 2 layers each of cupcake papers (I like the double-layered look, so I use two cupcake liners per cupcake).

Next, in a small mixing bowl, combine flour, sugar (not the powdered sugar – that's for the frosting), cultured buttermilk powder, salt, cocoa and baking soda. Using a whisk, stir the dry ingredients, spinning the whisk while you stir. Next, in your electric mixer, combine water, oil, eggs, vinegar and vanilla extract until blended, about 3 minutes on medium speed. Now, add in the dry ingredients and beat for an additional 3-5 minutes until the mixture is smooth. Now, it should look like chocolate cake mix (and taste like it too if you're like Mr. Grumpy and love eating cake mix raw… apparently he's immune to salmonella). Next, turn your mixer to low, and start adding in your red food coloring. A tip: you want it to be dark red when you're finished because when they bake, they turn lighter. So, I ended up using about 2 1/2 to 3 tbsp of red food coloring. Next, using an ice cream scoop, scoop the mix into each cupcake liner, until they are about 1/2 full. The mix makes a little more than 24 cupcakes. Bake the cupcakes in the oven for a solid 18 minutes – no more, no less. Halfway through baking your cupcakes, rotate them in your oven. Once they've cooked for 18 minutes, take them out of the oven and let them sit for 1 minute. Topple them onto a towel, and let them sit until they're cool. While they're cooling, we made our frosting. And by we, I mean I made the frosting while Mr. Grumpy played Nintendo and patiently waited for the beaters to lick… 

For the frosting, combine the butter and cream cheese, and mix on medium speed – about 3-4 minutes until it's smooth. Next, add in the almond extract and the powdered sugar and mix on low for another 3 minutes. Place your frosting in the fridge for 10 minutes to cool. Next, place your frosting in a pastry bag, and squeeze it out onto your cupcakes. Sprinkle the candy pearls on top. Serve immediately, or place in the fridge until you're ready to eat them.

IMG_2544

Now, being the classy lady that I am, I also made Robin a DIY present for her birthday. I got the idea from my bestie Ashley, who actually made me these coasters for me for my birthday last year. And I've been obsessed with them ever since and want everyone to have a set. Maybe because she made them using mustache paper and I think mustaches are hilarious. Which is also why, for Mr. Grumpy's birthday last year, Robin made us these amazing mustache glasses… I digress… So, I decided these would be the perfect housewarming/birthday present for Robin (especially considering I already got her and Mr. Salty mustache magnets for their fridge. I didn't want to exhaust the mustache thing). These are so much fun to make, you should go out and make them like… right now. 

What You'll Need: 

  • Mod Podge – matte finish
  • Scrapbooking paper 
  • 6 ceramic tiles
  • Felt pads (you can find these at the cash register at Home Depot)
  • Spongy paint brush (you know what I mean? Here… like this one)
  • Pencil
  • Scissors

Mr. Grumpy and I went to Home Depot to pick up the ceramic tiles, and just assumed that they would have felt or something soft to put on the back. You want to do this because if you don't, it will scratch your table. And then Mr. Grumpy will give you one of his looks… which is really just quite a hassle. So, after wandering for like 20 minutes, I asked a Home Depot associate if they had cork board or felt. He said, "Let me guess, you're making coasters." Like he knew everything in the world. I replied, "Um… yeah? How did you know? Is your girlfriend a Pinterest addict too?" To which HE replied, "Well, yeah she is. But that's not how I know you're making coasters. There's about ONE of YOU each month who comes in here looking for tiles and felt because they're making these COASTERS. Go to JoAnns, you'll find everything you need there." At this point, I wasn't sure if I should thank him or be offended. So I continued onto the cash register, where I found these felt pads, which are actually quite perfect because they stick to ceramic tile and you don't have to use super glue. This is great for me because I'm actually not allowed to use super glue anymore. Mr. Grumpy banned me from it the LAST time I tried to glue my jewelry holder back together and glued my fingers together instead. And then tried to rip them apart, which was very painful.

IMG_2514

So let's DIY, friends. First, wipe off your ceramic tiles with a damp cloth or paper towel. Make sure they're completely dry. Now, take the paper you want to use, and flip it over so the pattern is facing down. Trace your tile with a pencil, getting as close to the edge of the tile as you can. This will act as your stencil. Cut it out, and measure it on the tile. It should be slightly smaller than the face of the tile (the shiny top part). So, you'll likely have to trim it a bit. Next, cut out all of your stencils. I used different paper for each set (two ceramic tiles matched one another). I also added some scrapbooking stickers to two of them by sticking them right on the patterned-side of the paper. 

Now that all your tiles are washed and your squares are cut, it's time to Hodge Podge it, kids. So, take your foam brush and dip it into the hodge podge. Paint it evenly on the shiny side of the ceramic tile (like the side you'd want to be facing out if you were redoing your kitchen). Make sure it is a really even, thin layer because you don't want it to bubble when you place the paper on it. Next, place one of the paper squares, pattern up, on top of the tile. Smoosh it down so it's evenly place on the surface of the tile. Now, paint another layer of Modge Podge over the paper on the tile. Set it aside and let it dry. Do that for all six tiles. Once the tiles are completely dry, flip them over and place the felt circles, one in each corner. Each tile will get four felt circles (they are adhesive on one side which is awesome). 

Voila! Homemade coasters. Which came in handy for the drinking games the boys decided to play on Robin's oak coffee table… Boys will be boys, I suppose. 

IMG_2512

Mr. G and I moved… and didn’t kill each other (yet)

Well… that was fun. The rumors flying around the CLE are true – Mr. G and I relocated from quiet little Lakewood to the bustle of the city – DOWNTOWN. And let's just say it took us three days, two sets of parents, a surprisingly cheery Mr. Salty, a Robin, four cars (two trucks, my SUV and a moving van), and a LOT of beer. And what did I learn from our big move? A very valuable lesson – hire movers. Do it. Don't follow in my footsteps – movers are the way to go (no offense, Moving Squad. You guys were awesome. My nerves are still shot though…). 

But let's start earlier in the week – on Wednesday, when I went to make a crock pot dinner for Mr. G  to find that my crock pot was missing. And where was it? Well, Mr. G had PACKED it at the BOTTOM of our kitchen box. So, we ate pizza all week and stayed up until 1 a.m. on Friday packing the rest of Mr. G's junk treasures. Now, I am required by Mr. Grumpy Law to disclose that I had four tupperwares full of my shoes. Mr. G suggested I bring only one, and get rid of the rest. I reminded him that I could still claim his closet in our new apartment as my shoe closet, and that he was LUCKY that I was letting him have a closet to his self… but he was still pretty grumpy about the amount of shoes that had to make the GIANT 4-mile move downtown. I also discovered that Mr. G has not only a Playstation, but also has an Xbox AND a Super Nintendo… so I think we're pretty even on things we don't need… 

Despite the fact that it took us 4.5 hours to load our moving truck (plus two more days of moving sh*t over to our new apartment), we survived. And we already love it here. Suzie Q and DS helped us with some home decor renovations – including painting our old kitchen table, and refinishing the top to look brand-spanking new (isn't it beautiful???).
IMG_2116

We also power decorated (I was being slightly spazzy about getting everything put together. Basically after making Mr. G hang artwork for three hours after work on Tuesday, we got in a slight grumptastic argument about how I didn't need to make everyone suffer when I was having a … moment… I may have also thrown a fit about the location of a piece of tupperware… This is life, people.). 
IMG_2130

These are pictures hanging from antique door knobs! 

IMG_2134This is where the magic happens (note all the beer we had to drink to stay sane while moving). And yes, those are chalkboard jars! I'm obsessed – we got 4 from Target, and one cookie chalkboard jar from Anthropologie to finish the set.

IMG_2114I got my cake stand from TJ Maxx, and made the picture using an old birthday card Ashley got me a few years ago. 

Photo (12)Mr. G would argue that THIS is actually where the magic happens… disgusting.

IMG_2128This is where the snuggling happens.

IMG_2115Welcome home, Mr. G! (That's the Bike Art I made – plus we reno'd the dresser by buying new knobs from Anthropologie, and we dusted it for the first time in like… 12 months). 

IMG_2126One of the reasons we had to get everything decorated so fast was because we were having an unofficial Welcome to Downtown get together with our friends – Kels, B-Rad, Samantha and D-Train (he's really proud of his nickname). We were so pleased that we could literally WALK to Bar Louie, drink $1 beers all night, and then stumble walk home. It was a pretty amazing time – had by all attendees (despite the fact that we were supposed to go to the Indians' game, but never moved from Bar L). 

So, since it only took me a few days to completely unpack everything, I went ahead and stocked up on food – and got to cooking right away. I couldn't wait to use my new kitchen that had more than 2 feet of counterspace. Plus, I got to talk THE ENTIRE TIME I WAS COOKING because our kitchen opens up to the living room. Mr. G was really pleased. 

So, for the first time in our lovely, swanky downtown apartment – let's get cooking, people!

It's Springtime, Baby Pasta!

I made my grocery list today whilst sitting in the parking lot of my eye doctor, and managed to only forget one item ($325 later…). Don't worry – Mr. G got an entire bushel of bananas (bushel? bunch? What is a group of bananas called???). 
IMG_2111

(I had a moment at Anthropologie, obviously. I got new bowls – this is one of them. I love this. I'd love it even more if it were full of ice cream – the one thing I forgot at the grocery store). 

I adapted this recipe from the lastest issue of Cooking Light – mostly because it said to use fava beans, and I have NO idea what those are. They sounded really involved – and needed to be deshelled… And I wasn't really feeling that. So I used lima beans. YES. LIMA BEANS. And they were delicious, so bear with me here, people. 

What You'll Need: 

  • 1 8.5 oz. can lima beans
  • 1 1/4 cup uncooked campanelle pasta (that's the kind that is squirly-queued on the edges). 
  • 2 tbsp extra virgin olive oil
  • 6 center-cut bacon slices, cut into 1/2 inch pieces
  • 6 cloves of garlic, chopped roughly
  • 1/2 red onion, chopped
  • 1/3 cup white mushrooms (broken into chunky pieces)
  • 1 cup frozen peas
  • 1 lemon, juiced and zested
  • 1/4 tsp salt
  • 6 tbsp grated parmesean cheese 
  • 1/2 cup basil leaves, torn into pieces 

First, boil your water for the pasta. Boil your pasta for about 11 minutes, depending on how you like your pasta. Basically, it needs to be cooked. While you're waiting for the water to boil, you can cut up all the ingredients. And if you have a mile of counterspace like I do now, you can take up the entire kitchen and use 3 plates, 2 cutting boards and 3 knives. Just because you can, goshdarnit. 

Anyway, while your pasta is cookin', heat 1 tbsp of olive oil in a pan over medium-high heat. Once that's hot, cook your bacon in it until it starts to crisp up slightly and get brownish. This will take about 3 minutes. Then, turn your heat down to medium. Add the onions and garlic, and cook until the onions are transluscent. This will take about 4 minutes. Add the mushrooms and cook for 3 more minutes. Add the lima beans (DRAIN THEM BEFORE YOU ADD THEM. Sorry, I don't know why I started screaming at you. You didn't know…). And add the peas. Cook for 1 minute. Add the remaining 1 tbsp of olive oil, lemon juice and zest, salt and cooked pasta, and stir and cook for an additional 2 minutes. Remove the pan from heat, and add 3 tbsp of cheese. Stir. Put it into a bowl, and garnish with 1 tbsp per bowl of cheese and 2 tbsp basil per bowl. 

I was surprised at how much flavor this dish had. I knew of a similar recipe that a roommate from college used to make, and it didn't have this much flavor. This is really great. And took about 20 minutes total to make. Ah-mah-zing. Thank you, Cooking Light. (And did I mention that each bowl only packs 371 calories? YEAHHHHH!). 

DIY Bike Art and Why Your Crock Pot Should Be the Last Thing You Pack

First let me preface this ENTIRE post by letting you in on the next big thing coming up in Mr. G's and my life – we're MOVING. That's right – a whole 4 miles east to Downtown CLE, where we will get fat on Map Room Pizza and Noodlecat happy hours, and be very, very merry. I hate moving. And as such, Mr. Grumpy gets to deal with a Miss Grumptastic all week. 

Also, Mr. Grumpy has a very hard time staying focused on packing. For example, I asked Mr. Grumpy to pack up his desk, and while he worked on that for three hours (and at the end, nothing in his desk had been packed), I had packed six boxes and completely cleared off our bookcases. So, wish us godspeed as the weekend continues to creep up, because it's going to be a bumpy, 4-mile ride. 

DS and Suzie Q came this weekend to assist with some packing (and it was Suzie Q's bday!). DS got really excited when Mr. Grumpy and I gave him a car-load of items to sell at his garage sale. So excited, in fact, that we broke this mirror:

IMG_2091

So, I took it upon myself to make a DIY project out of it. Mr. Grumpy was NOT enthused when I started painting on our carpet (on top of a cardboard box, people! I'm not a crazy person. Gosh). We have been searching everywhere for some bike art for our new apartment in the Big City, and have been finding nothing even within the budget we wanted to spend (uhh, would you take $25 for that $300 painting?). So, over the weekend, Suzie Q and I went to Papertrails in Rocky River, and got some amazing bike wrapping paper to use for art. So, I think it was a sign (minus the fact that now we're going to have seven years bad luck because we broke a mirror) that we make this bike art. AND I say, if we're going to have super bad luck, we might as well have hellacute walls while our life falls to pieces. 

I digress… So, if you want to make your own bike wall art here is what you need:

  • Sample size of Behr matte paint (we bought Antique White). You can really use any brand you like… We just used Behr.
  • A paint brush (the foam one didn't really work that great, so we used the one with "hair" – I don't really know how else to explain that so I'll move on)
  • A cardboard box
  • Pretty paper 
  • An old, broken mirror

First, remove the backing from your mirror. If yours is like ours was, it was stapled. So I pryed the backing using a screw driver, keeping the staples in tact. Next, place the frame onto a piece of cardboard. Then, paint the frame – I wanted it to look slightly old and worn, so we only did one coat. Let that dry.
IMG_2097

Next, cut out the piece of cardboard you painted on, using the paint stains as a guide. This will act as your mat. Then, cut out your paper to match the size of the mat. Tape it onto the cardboard, and flip it over onto your dry frame. Hammer the staples on the backing back onto the frame, and VOILA! You have bike art that cost you $2.95 instead of $300. 

IMG_2103
Mr. Grumpy was not super enthused about it because the bikes have baskets that have flowers in them. Apparently he wanted something more rugged and manly. But, c'mon Mr. Grumpy. You live with a girl. What did you expect? Save your rugged manly art for your Man Room (aka, the Man Bathroom, that I do not enter under any circumstances). Yes, Mr. Grumpy and I have separate bathrooms. Don't judge me – there are just some things that need never be shared in a relationship. Like bathrooms… and bike shorts

Now, in between all my mad crafting, we managed to pack MOST of the apartment. Mostly due to Suzie Q's undying energy. That woman sure is a speedy bullet when it comes to packing. But, let me give you some advice about packing. Never, never pack your crock pot until the very last moment. In fact, I'd argue that's one of those things you should throw in your car with you. Why? Well, let's be honest. The week before a big move, do you think you're going to feel like cooking dinner? Um, hell no. You're not. And instead of ordering pizza every night of the week (tempting, right?) and gaining 10 pounds before moving, use that crock pot. Use it, friends. You will not regret it. 

That's why I'm sharing with you my new favorite crock pot recipe, in honor of the kick-off of our last week at our apartment from you-know-where… 

Crock Pot White Chicken Chili with a KICK! 

IMG_2088
Recipe adapted MAJORLY from Land 'O Lakes: http://www.landolakes.com/recipe/3740/white-chicken-chili

Mr. Grumpy was SERIOUSLY grumpy about this dinner because I made him go to the grocery store to buy the ingredients. The grocery is a very scary place for Mr. G, especially with the way I write our grocery list. He gets extremely frustrated when I put down "onion" and don't specify what color. Or when I write down "block of white cheese" when there are 100 flavors of white cheese to choose from. So, three hours, 20 texts and 5 calls later, Mr. G came home with all my groceries and grumped onto the couch where he pouted… It was not our best moment. I promised to do a better job at indicating what KINDS of food I need or to never, ever send him to the grocery story alone, ever again (I'm going for the latter). 

What You'll Need:

  • 1 8 oz. package of 1/3 less fat cream cheese
  • 1 lb boneless, skinless chicken breast, diced into 1" pieces
  • 1 block of white cheddar cheese, cut into small 1" blocks
  • 1/2 block of pepper jack cheese, cut into small 1" blocks
  • 1 can of diced tomatoes (I used the Fire Roasted Garlic flavor – yum); drain these very slightly
  • 3/4 cup chicken stock
  • 1 can of Mexi Corn, drained
  • 1 red pepper, cut into chunky pieces
  • 1 sweet onion, diced
  • 3 garlic cloves, chopped really finely
  • 2 cans Great Northen Beans (don't drain, or do so slightly. You want a bit of juice in there)
  • 1/4 tsp red pepper flakes
  • 1 package of Ranch dressing mix
  • 2 tbsp cumin
  • 2 tsp chili powder
  • 1 tsp onion powder
  • salt and pepper to taste
  • Cilantro, for sprinkling on top when it's cooked. "Decorative Cilantro" if you will… 

Combine everything in your crock pot. Cook on high for 3.5 hours (or on low for 6-7 hours), stirring occasionally. And… serve. Seriously. It's that easy, people. Phew. Now, on to packing our linen closet! 


Crafting with Cari & Robin (and that time I said my banana bread was better than Martha Stewart’s…)

Today, my friend Robin and I had the very first (and first of many!) installment of Crafting with Cari – we were working on the centerpieces for her wedding! We saw these glittery wine bottles on Pinterest, and she had the amazing idea to glitterize Mason jars. Seriously, this is the easiest craft project you'll ever do, and the best craft project you'll ever do as well. It. Was. Awesome. 

Now, let me preface this by telling you that I am TERRIBLE at crafts. In fact, I got a B- in Middle School Art class. And I do NOT get B's, so that was a big deal. I got docked major points for not cleaning up my art station, and also the fact that I rushed through all my art projects so that the vases I was pottery-ing always fell apart. My art teacher often had to supervise me… it's very hard to do artsy things whilst talking and flirting with all the boys… 

But, Robin put her faith in me, and put my crafting to the test, and we DID IT! And again, I say, these are awesome:
IMG_1898

All you need is:

  • A jar of Modge Podge 
  • A jar of glitter (we used white)
  • A mason jar
  • A paint brush
  • Acrylic sealant (it's by the spray paint)
  • Masking tape

First, make sure your Mason jar is clean and completely dry. Then, tape the part where the lid usually goes. Pour out the glitter and spread evenly upon some parchment paper. Paint the outside of the Mason jar with Modge Podge (make sure it's really even, because whereever there is a glob of Modge Podge, there will be a glob of glitter. We learned this lesson, but they still look really good when they're done).

Roll the Mason jar through the glitter, so that the jar is completely covered. Let it dry for about 30 minutes, and then spray it with the sealant, and Voila! Your new best home decor piece ever – and yes, everyone WILL be jealous and likely go home and make it themselves, so be prepared for lots of people to copy you.

Now, when I went home, I wanted to do something nice for Mr. Grumpy because he had a really rough day missing me for hours while I was with Robin. A few days ago, I stole Mr. Grumpy's beloved bananas and hid them in the freezer so that I could make banana bread. Everyone knows that when your bananas get just about TOO ripe, you put them in the freezer to save them for when you're ready for bread makin'. (My biggest sister Annie taught me that one!) 

Well, Mr. Grumpy is kind of… attached to his bananas (too much?? OK get your head out of the gutter). And, when he found out that  I had taken his bananas to the freezer and that they were lost to him forever, he was pretty upset. What was he to eat at lunch with his leftovers? (Try another fruit, Mr. G) Why would I do that to his bananas? (Because something even MORE awesome was coming) In fact, one day, he even came home from work with a banana and hid it from me so I wouldn't steal it. I still haven't found it, but I imagine that it'll start smelling soon.

So, after a day of crafting, there was nothing I wanted to do more than make this amazing banana bread I found in Martha Stewart's Baking Handbook (I adapted her recipe for Banana Walnut Bread, and made an EVEN BETTER – yes, I know I just compared myself to Martha and said mine was better – Cari's Cinnamon Twisty Banana Walnut Bread. 

IMG_2075

Cari's Cinnamon Twisty Banana Walnut Bread

What You'll Need:

  • 3 cups all-purpose flour
  • 1 tsp baking soda
  • 3/4 tsp salt
  • 3 eggs
  • 1 1/2 cups sugar
  • 1/2 cup cinnamon sugar (I made mine from scratch – just add 2 parts sugar to 1 part cinnamon. I always keep a Mason jar of this handy. Goes great with toast… and in banana bread)
  • 1 1/3 cups canola oil 
  • 2 tbsp vanilla extract
  • 1 cup sweetened coconut shreds (like the ones I used for the coconut shrimp!)
  • 4 ripe bananas, removed from their skins and mushed up (Sorry, Mr. G, but isn't the bread YUMMY? Wasn't it WORTH IT?)
  • 1 cup walnuts (broken up by hand into small pieces)
  • 2 tbsp buttermilk powder (or 1/2 cup buttermilk) … (I bought the powder kind that you get in the baking aisle. My friend Melissa introduced me and I'm obsessed!) 
  • 1/2 cup water (ONLY IF YOU USE THE POWDER BUTTERMILK)

Let's get cooking! First, preheat your oven to 350. Then, in a small bowl, combine flour, salt, buttermilk powder and baking soda. Set aside.

Next beat the egg, sugar, cinnamon sugar, oil and water – only use the water if you are using the powder buttermilk. Add in flour and combine with your mixer. Then, add in the vanilla extract, coconut, walnuts and bananas. Mix until combined nicely.

Spray 2 loaf pans with non-stick cooking spray (or use butter). Pour the batter into each loaf so each has the same amount. There should be about 1-2 inches of space left at the top of the pan, if you're using a 9X5" pan. Bake in the oven on the middle rack about 65-70 minutes. You'll know that it's done when it is a dark brown color, and you put a toothpick in it, and no batter comes out. I ended up baking mine for 67 minutes.

You can freeze one loaf for up to 3 months, or take it into work and impress all your coworkers. Or win over the man of your dreams by letting him eat a half loaf during dinner (ahem, Mr. G.). Yes, a half loaf is already gone… I'm not joking. This is why mine is better than M. Stewart's.

martha Stewart